

Pansies, the all year flower!
I had been waiting to experiment with a technique I had read about, but had not had the opportunity to work with, when Sydney and I were approached to create an edible party favor for a six year old’s birthday. The birthday theme was pansies. Lighting bolt: what could be more perfect than a pansy garden, a sugar cookie pansy garden? With bright beautiful colors and the elegant simplicity of pansies, the cookie blooms into an eye catching delight!
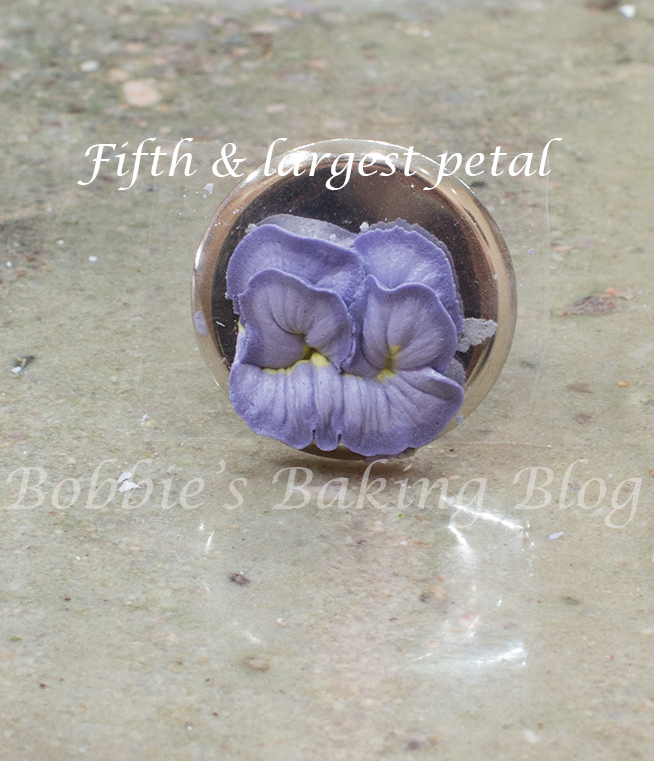
The technique requires working with two or more colored icings in one pastry bag, placing the colors strategically in a specific order to create a flower in which the colors lay correctly as a bloomed flower. For the pansy garden we decided to create a three tone flower; working with three colors consisting of lemon yellow, dark violet, and light violet. As we began to pipe the pansies the flower literally came to life with the final fifth and largest petal.
Pansy Garden:

The colors remind me of “Alice in wonderland”
Lemon yellow food paste
Voilet food paste
Tooth picks
Small petal tip, PME #58S
Round #1 tip/tube
Coupler
3 disposable piping bags
A few drops of vodka
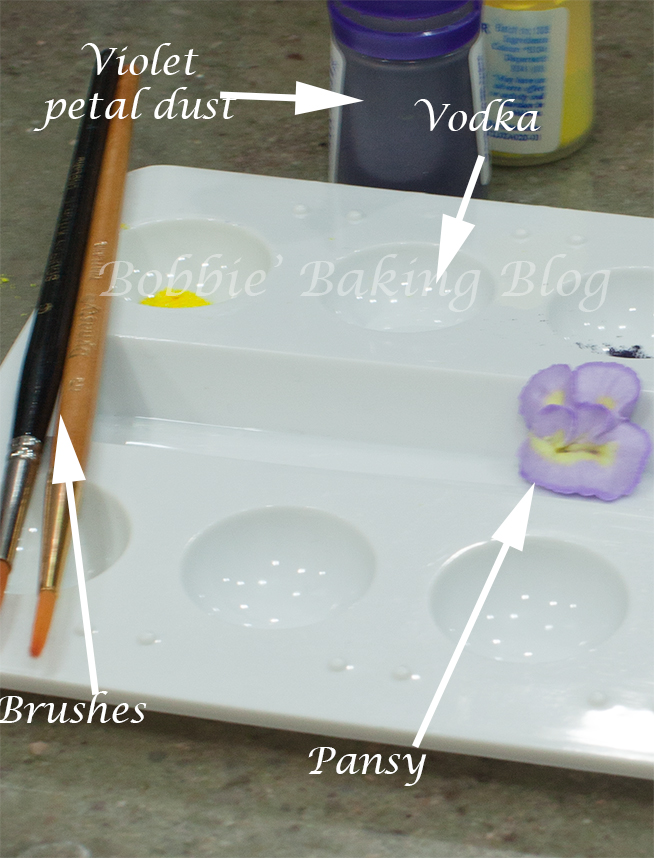
Violet petal dust
Paint brushes
Icing Nail
Cold water, to soften the royal icing
Eye dropper
Palate
Prepare your mise en place and color 1/4 cup of royal icing yellow, 1/4-cup dark violet, and 1/2 cup light violet. Place the lemon yellow in one of disposable piping bags and the dark violet in another piping bag; fit the third piping bag with your coupler and petal tip. Set aside.

Mise en place
Dip a tooth pick about 1/4 the way up in the lemon yellow paste, add the paste to the prepared royal icing, using a very clean spatula amalgamate the yellow paste, place in a piping bag without a tip, and close the top. Dip 3/4 of a tooth pick in the violet paste, add the paste to the prepared royal icing, using a very clean spatula amalgamate the purple paste, place in a piping bag without a tip, and close the top. For the light violet dip your tooth 1/4 -1/2 of the way up in the violet paste, add the paste to the prepared royal icing, using a very clean spatula amalgamate the purple paste, place a damp paper towel over the top of the light violet royal icing, and set aside.
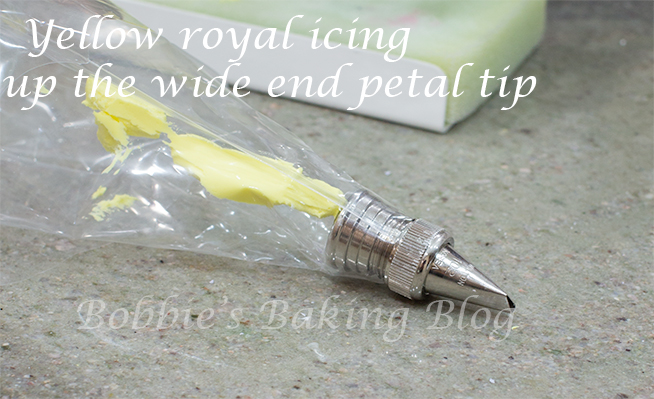
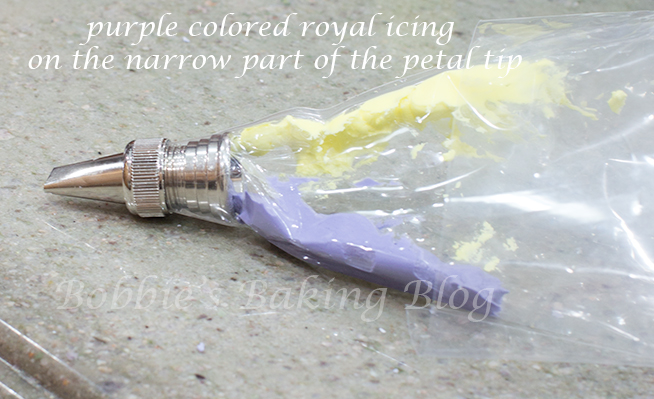
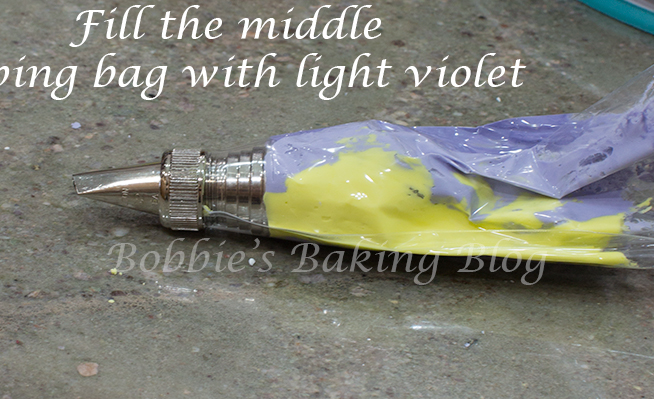
Take the petal tip prepared bag, line the yellow royal icing from the wide end of the petal tip so the yellow runs up from the wide end side of the tip and towards the top of the bag. Now line the dark violet from the narrow end of the petal tip so the dark purple runs up the same side as the the narrow end (the opposite side of the yellow). Remove the damped paper towel from the light violet royal icing, using a very clean spatula add the the light violet royal icing directly in the middle of the two colors, release any air from the bag, squeeze the piping bag with the petal tip until you can see all three colors separately on the same line, and begin to pipe your pansy.
If you haven’t noticed my petal tip is the opposite of my directions in the slider; I realize my error prior to piping and turned the tip. Sorry for the confusion.
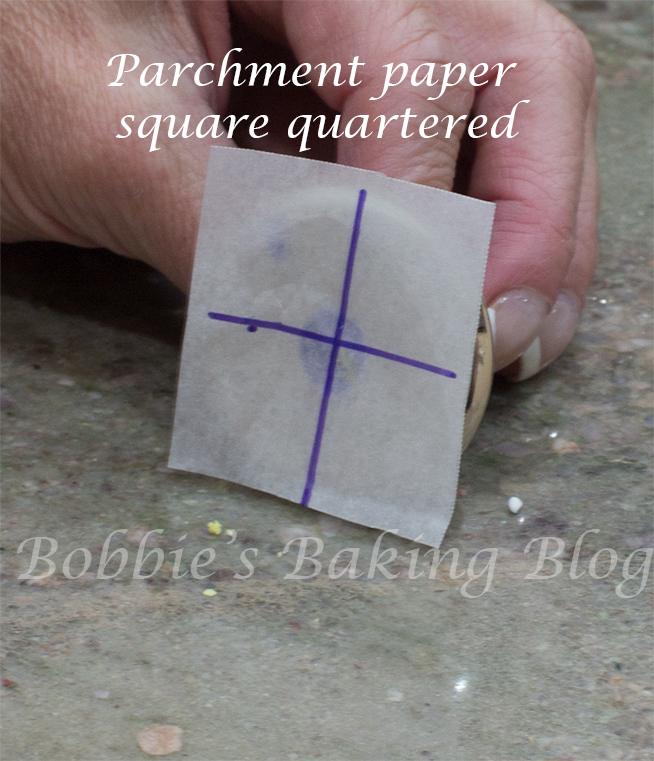
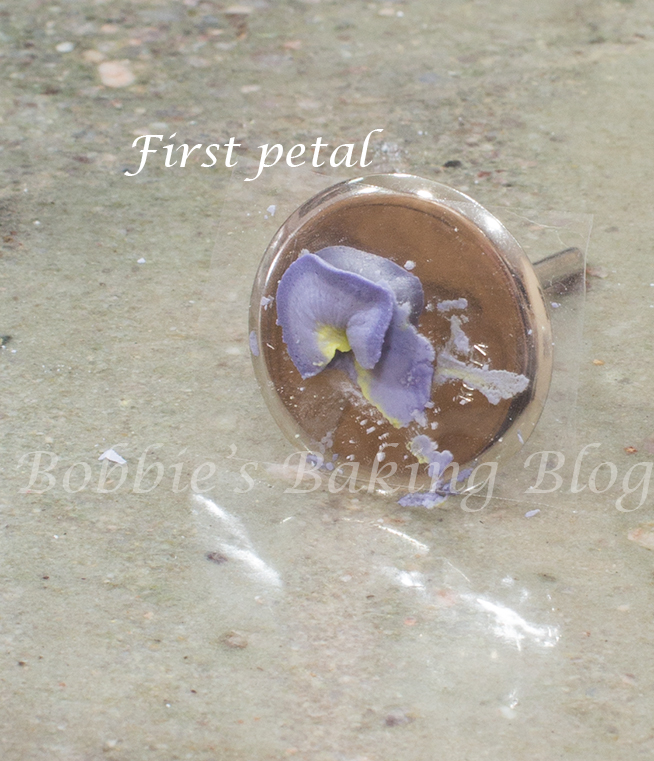
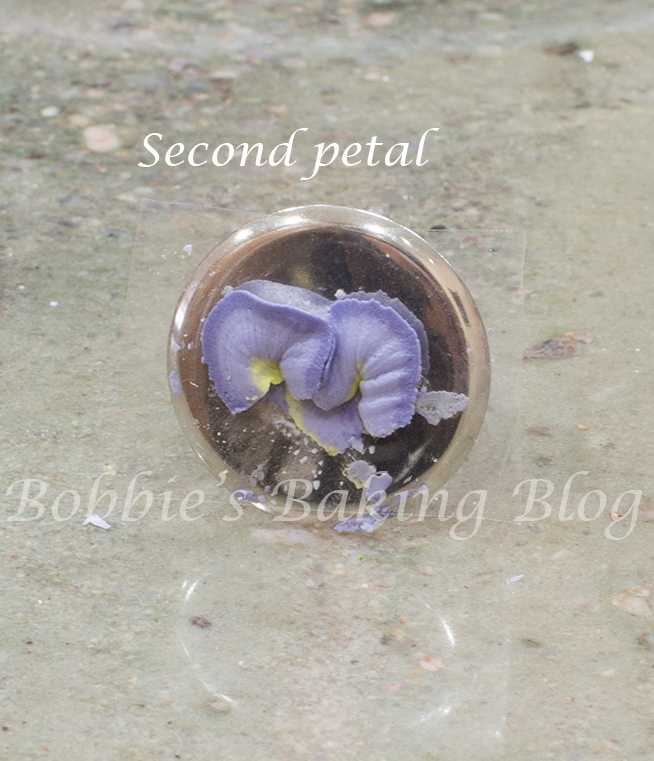
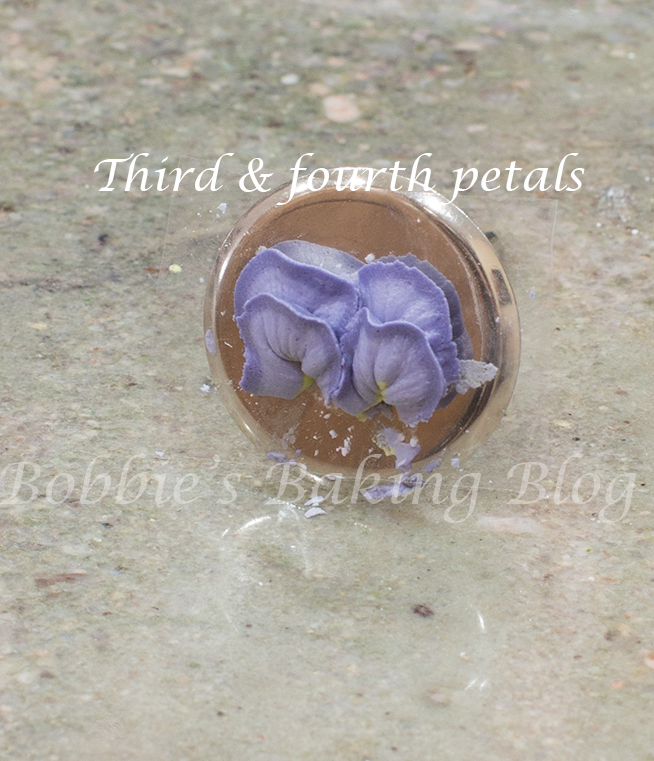
For piping the three tone pansy cut about 20 1.5-inch/3.8 cm square cellophane or parchment paper square. The pansy is a five petal flower with two petals piped in the back, two petals piped on top, and the last petal is the largest piped around the bottom half of the flower. If a guide might help you to aline the five petals draw a large t-shape through the middle of the parchment paper. Begin by holding the icing nail towards you, pipe a dot of icing on the icing nail, place either the cellophane or the guide drawn parchment paper on the dot. Pipe two large petals,the wide end of your petal tip should be down (facing the nail), keeping the tip almost flat, begin in the middle with even steady pressure piping from the center of the icing nail about 1/2 of the way up the nail, pivot the tip slightly to right and pipe back to the starting place as you turn the icing nail counter clockwise. The second petal is almost piped the same, but begin with the wide end of tip slightly touching the outside of the first petal. For petals 3 and 4 place the wide end of the petal tip sightly below the first petal, these petals will over lap the the first two petals. The 5th and last petal is the largest and directly opposite the 4 other petals, using even pressure move the petal tip back and forth towards the right, this will ruffle the the last petal. Allow the pansy to dry completely.
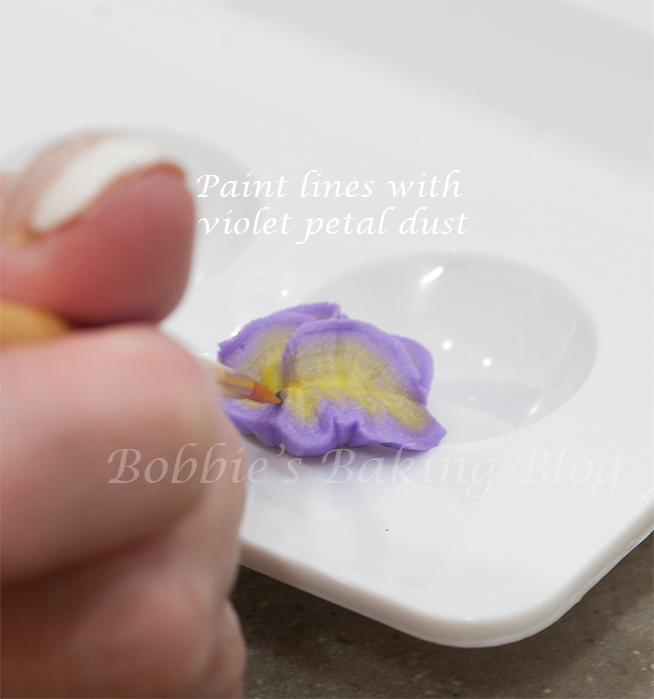
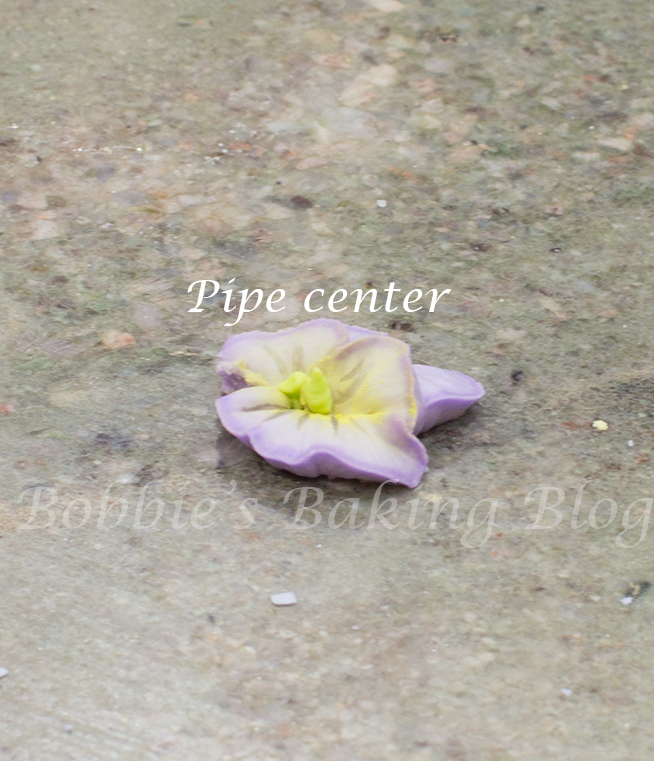
To bring your pansy to life paint a few dark violet lines on the middle of the pansy. You will need a few drops of vodka, a paint brush, a palate, and violet petal dust. Dip the brush lightly into the vodka and then into the violet petal dust, follow the grooves in the flower, painting the lines, and pipe a center cone with yellow or lime green royal icing. To create the garden we piped leaves, with a leaf tip, all around the sugar cookie. Attach the pansies with a little royal icing, matching in color. Allow to dry completely.
I must admit Sydney and I had a BLAST, watching the colors appear!

Don’t the Pansy Garden Cookies just cheer you up!!
Enjoy!

Voila!


These were the most exquisite cookies I think I’ve seen in a long time–if ever! As I was reading your description of the method, I came up with a few more variations. Very inspiring! Thanks!!!
Thank you, I would enjoy hearing your variations!
Wow, this is so beautiful! Great job!
How sweet, Thank you!
Great job on the pansies! They look so lifelike =)
Thank you!