

Cross stitching with royal icing is fun and rewarding!
Cross stitching with royal icing is a delicate and elegant cake decorating technique perfect for weddings, bridal shower, baby showers, or any special event.
Cross stitching with royal icing seems to have began in Eastern Europe, and has since gained popularity all over the globe.
The technique is fairly easy to understand, however cross stitching an intricate royal icing method; the process consists of creating a grid of perpendicular lines in both horizontal and vertical directions. The next step is to replicate a design by counting the squares of the royal icing grid. It is imperative to have the correct consistency of royal icing for both the lines of the grid and beads.
I have prepared a detailed video tutorial exhibiting how to cross stitch with royal icing. Once you have mastered the grid and understand how to use the royal icing beads to create your design the possibilities are endless.
Cross Stitch with Royal Icing:
Cross stitching with royal icing is so rewarding!
Equipment:
- # 5/0 soft artist brush
- Scriber
- Parchment paper cornet,
- #1 PME nozzle, 2 will be needed
- Blank grid (if you are creating your own design)
- Cross stitch pattern grid
- Mini off-set spatula
- Work board
Materials:
- Royal icing
- Cooled boiled water
- Spray bottle
- 1-recipe for Vanilla bean sugar cookies
You can find supplies, cross stitch patterns, and grid at 5th Avenue Cake Shop
I prefer to use raw egg whites for the strength, you can use dehydrated egg white powder if you are not comfortable with the raw egg whites.
Consistency royal icing recipe:
The correct consistency is soft peak. To achieve a soft peak consistency I find using a spray bottle with cold water and off peak royal icing works wonderfully. Place about 2-Tablespoons of royal icing on non-fat work surface (board) rub the off-peak royal icing against the board with your mini spatula. Once you have expelled the air bubbles slowly spray a tiny amount of cold water to the icing. Continue to add the cold water until the icing’s peak curls over. To quote Mark Seaman the peak should resemble “Dairy Queen soft serve ice cream curl.”
Use your mini spatula and place the icing in a parchment paper cone fitted with #1 nozzle/tip ( you can use the cornet without a piping nozzle if you prefer).
Bead Consistency:
Follow the same method for the line consistency, except you will need to add more cold water. The icing needs to be between a soft peak consistency and 15 second flood consistency.
Place the icing into a parchment cone with your mini spatula. Test the consistency, pipe a few beads close together, if the beads maintain their shape, and the bead is round with out peaks you are ready! This technique was created by Julia Usher for more information visit Cookie Connection

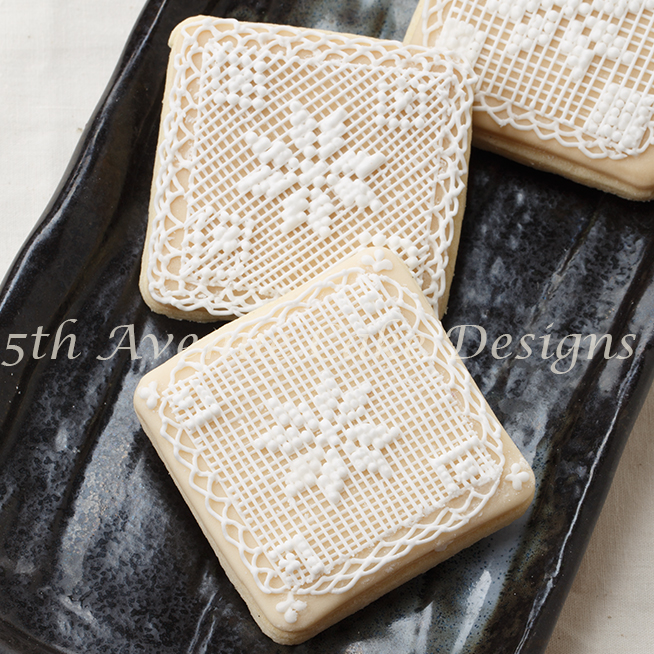
The cookie in the back has larger individual squares, in order to see the difference.
Please enjoy the Cross Stitch Video Tutorial:
For a more in depth video and the templates:
Cross Stitch with Royal icing Bundle:
Includes
The Cross Stitch Royal Icing Video.. 24.42 minute
Cross Stitch with Royal Icing Pdf
Cross Stitch with Royal Icing Blank Template
Or
You may purchase them separately.
Tips for success:
I find if you wait about 2 minutes after you have piped the grid, prior to piping your beads.
Continually count your squares for each section.
Pipe your board once the cross stitch is completed.
The finer and smaller you create your grid the more sensational your finished cookie will look!

Happy royal icing cross stitching!


I am a veteran cross stitcher but never attempted the art on cookies! This may be a new path… !
Please share your design and Thank you!
I have done this on cakes too! This is one I made last year for my daughter
I would enjoy seeing a picture!
I want to dip these biscuits in my tea now! So beautiful! http://madelienerose.com/
Thank you!
Awesome!
Thank You!
very very nice. thank you.
My pleasure!
Wow, these are so beautiful! You really have a steady hand and a lot of patience!! Thank you for sharing!
Thank you!
Do you have patterns that you can look at to copy onto a cookie.
I cant draw O would need to look at a design to copy it.
Thanks,
Sharon
Sharon my designs, templates, and photographs are apart of 5th Avenue’s Cookie Art Academy! https://shop5thavenuecakes.com/