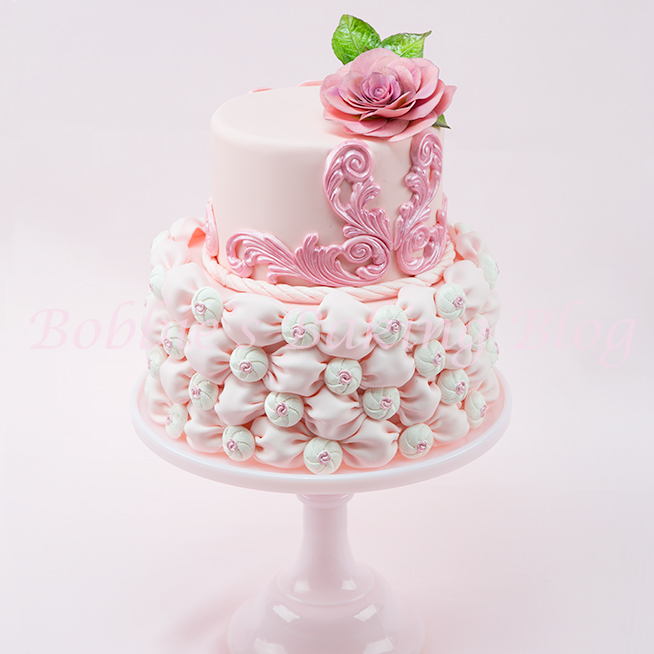
The billows appear soft and fluffy!
I just adore tufted billow weave on a cake, and have decorated quite a few cakes with the tufted billow weave method. Susan Trianos started the puffing trend and it would behove you to visit her website. She has an exquisite cake gallery!
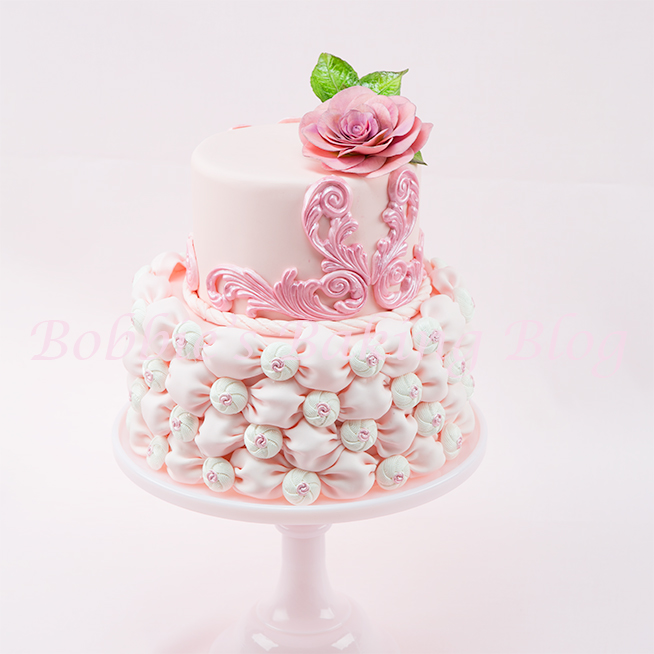
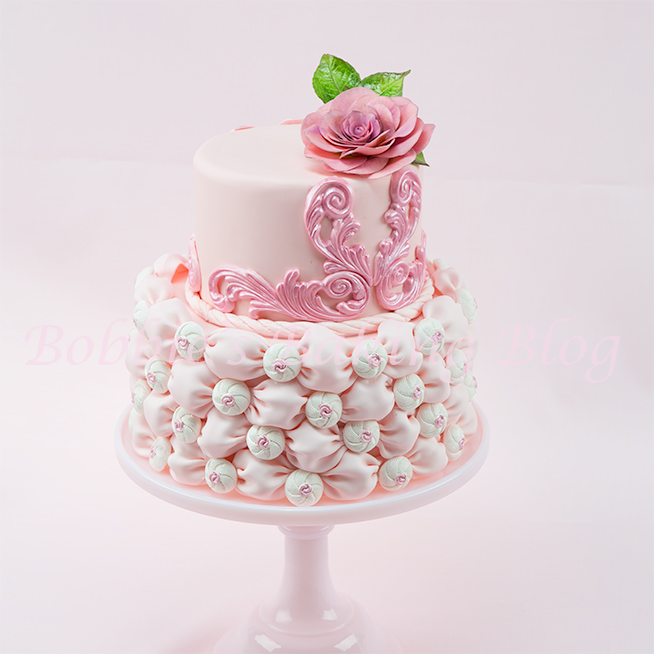
Back to the cake above: after adding the tufted billows and medallions I then proceeded to created a fashion sugar inspire rose for the top layer,(it was important to keep the fashion inspired design). I thought this would be a creative and exciting tutorial to share with you. If you would like to see a video on the tufted billow weave please let know.
Fabric Tufted Billow Weave:
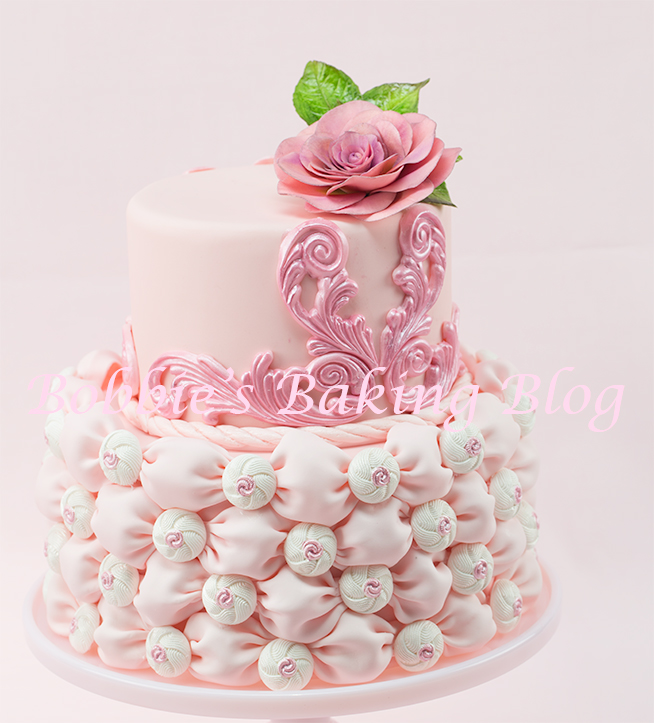
Wouldn’t this cake be perfect for a wedding, birthday (girl),
bridal shower..Anything special?
Equipment:
- Square cutter 2-1/2×2-1/2
- Plastic mat
- Scroll mold, MYOM
- Button mold, MYOM
- Straight pins
- Ruler
- Scriber
- Paint brush
- Small fondant rolling pin
- Airbrush, optional
- Pasta machine
- 6×4-inch crumb coated cake or 6×4 cake dummy
- 8×4-inch cake or cake dummy
- Plastic cups, 6
- 6 hollow dowels or lollypop sticks
- Flat brush
- Artist #4 round brush
- Susan Trianos DVD
Material:
- Fabric Fondant Rose, leaves and calyx, created at least one day prior
- 880 grams Wedding WhiteFondant, Fondarific
- 125 grams Gumpaste/Sugar paste
- Airbrush colours, pearl white and pearl pink
- Food paste, fade-proof pink, Americolor
- Artist paint brush, stiff & round
- Bowl of water
- Cornstarch
- Edible glue
- Royal icing
Prepare your mise en place.
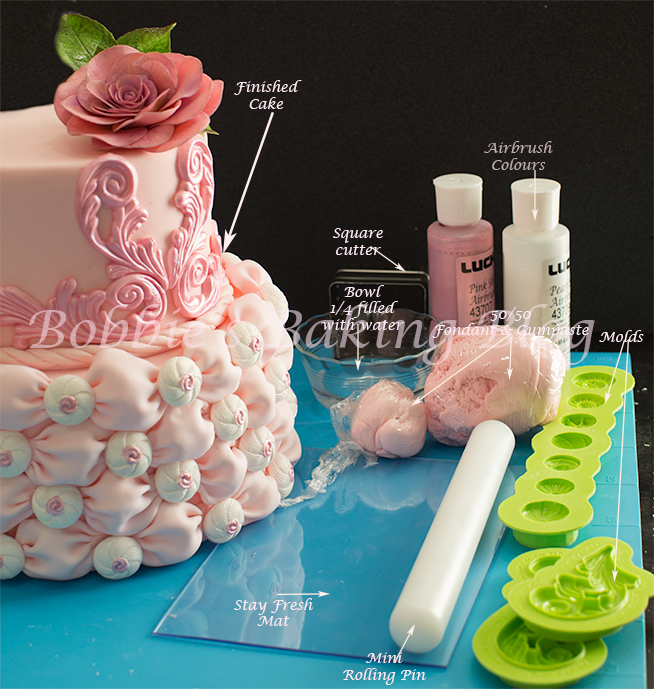
Tufted billow weave mise en place!
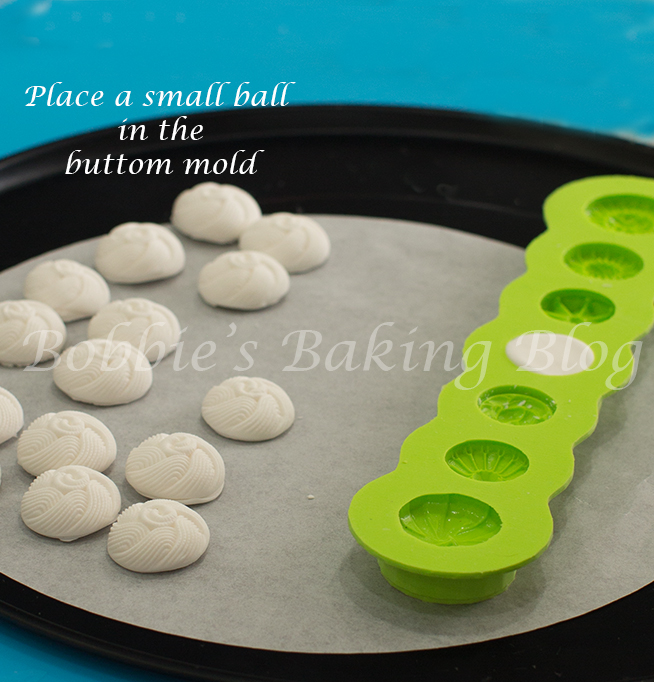
Medallions/Buttons:
You will want to create your medallions first. Choose any type of medallion or button mold that will fit between the billows. I choose a knot button mold designed by Marina Sousa.
Take a piece of well knead gumpaste,roll the paste into a ball and push into your prepare lightly cornstarch mold. Pop the medallion out and allow the medallion/button to dry for at least four hours.
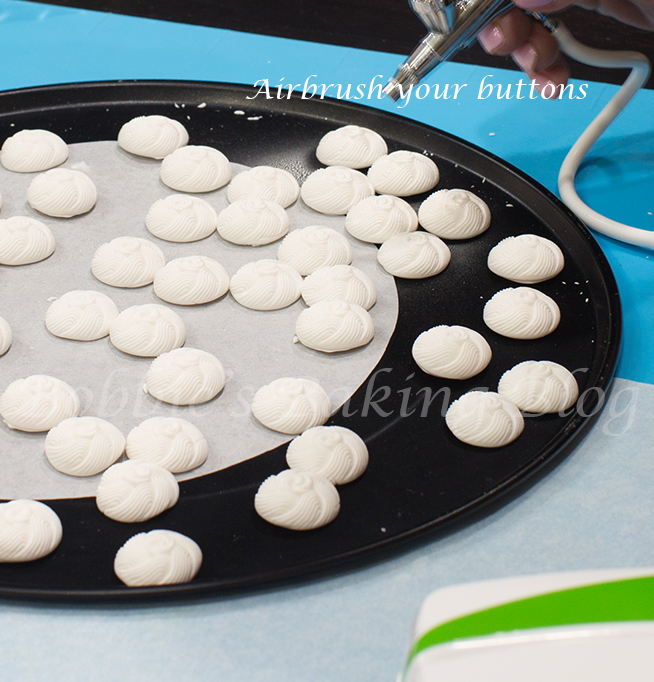
Airbrushing:
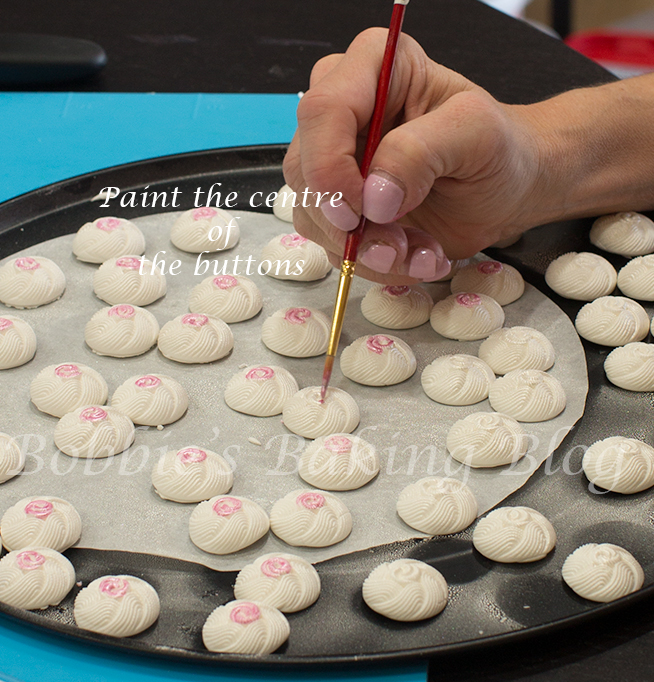
Shake your airbrush well, place a few drops in your air brush. Place the medallions/buttons on a baking pan (I used a pizza pan) lined with parchment paper for easy clean-up. Begin to air brush the main color (I used pearlized white). Once all the medallions/buttons have been airbrushed use a round #4 brush and paint the accent colour.
Allow the painted medallions/buttons to dry for 24 hours. The paste needs to fully dry.
If you do not own an air brush you can hand paint the medallions/buttons.
The Billows:
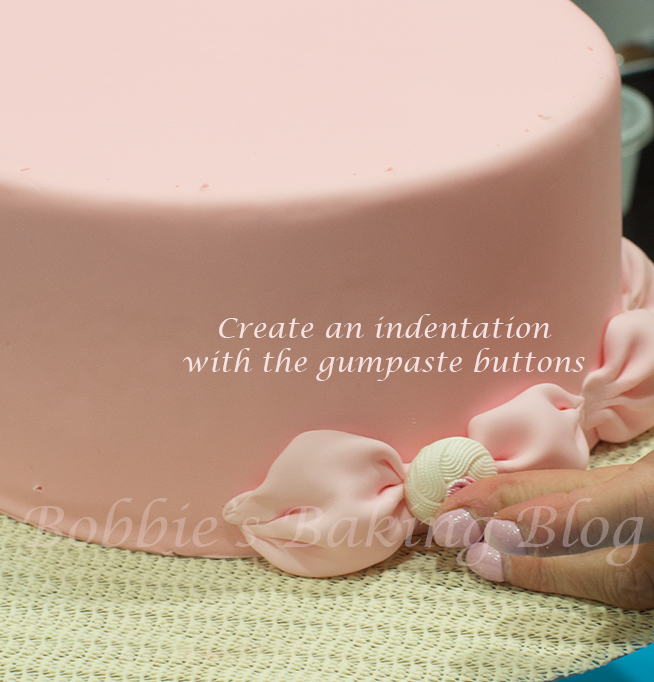
Remember to indent a space for the medallions prior to the paste drying!
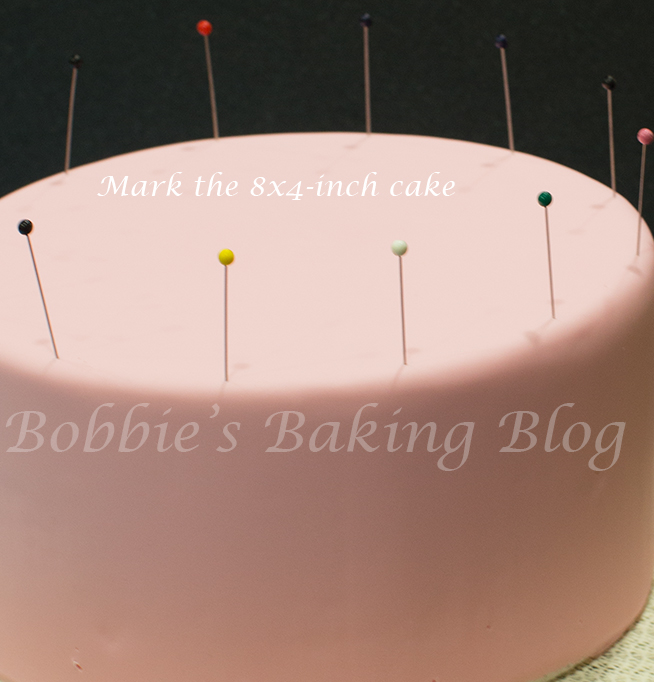
Knead and color 425 grams of fondant pale pink. Cover an 8×4-inch cake with 425 grams of pale pink fondant. Smooth fondant well. Begin marking your cake with straight pins space 2-inches apart. Once your cake is marked with all the pins place a ruler lengthwise on the cake from each pin to the bottom and mark the bottom with a scriber, Each of the bottom marks should align with each pin on the top of the cake. Remove your pins.
Knead 125 grams of the pale pink fondant with 125 grams of gumpaste, creating a 50/50 paste. For each row of billows you will need 62 grams of 50/50 paste, for an 8×4 cake, you will be adding four rows of 12 billows. Place all but 62 grams of 50/50 paste in a plastic bag to keep the paste from drying out. Roll the 62 grams into a rectangle and place the 50/50 paste in a pasta machine. Gradually roll the 50/50 paste to #4.
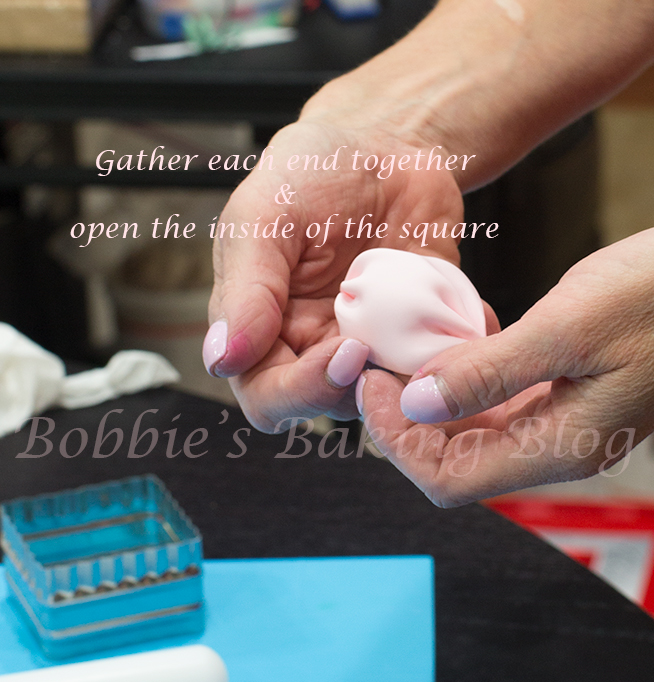
You should have a long 4-inch wide strip, cut out 12 squares 2-1/2-inch squares. Place eleven square under your plastic mat to keep them moist. Brush edible glue on the edge of one side of 2-1/2-inch square, pleat the edge as you would for a fondant bow, gently pinch the pleats closed, and repeat for the other side. Open, puff up the billow and place the billow under a plastic cup to slow down the drying process (your billows should be able to hold it’s shape, but still be pliable to attach to the cake). Continue the same procedure on next eleven billows. Two billows will fit under one plastic cup.
Place the the Billows on the Cake:
First Row:
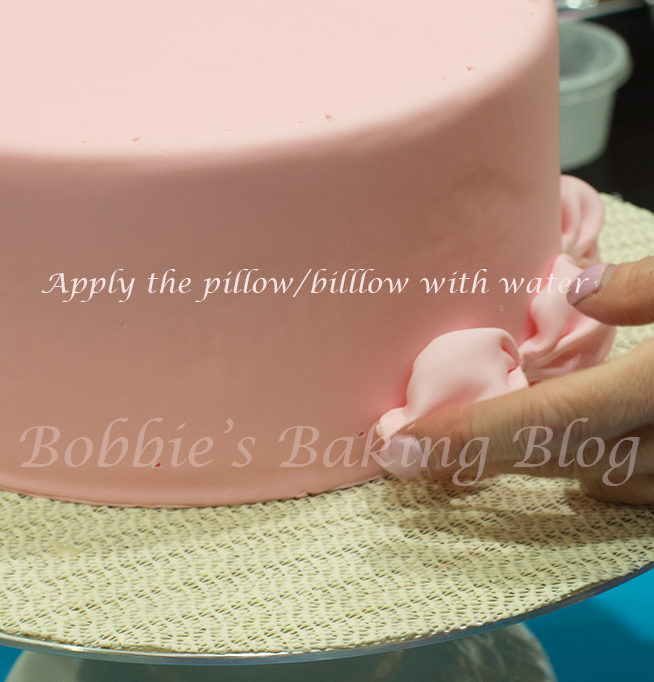
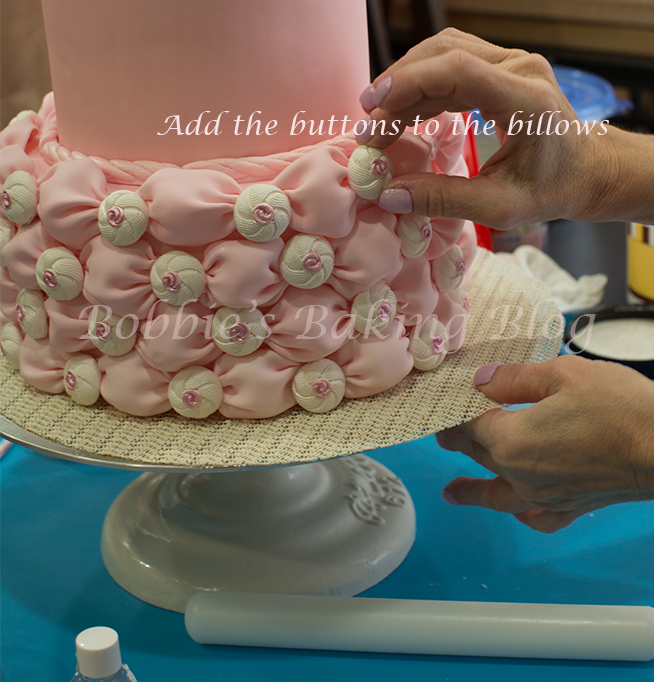
Begin attaching the billows, in the order you created them, on the bottom of the cake. Using your flat brush, brush a circle of water between the two 2 1/2-inch marks on the bottom of the cake, align one side of the pleated billow on the first scriber mark and the opposite side of pleated billow to the adjacent scriber mark press the pleats firmly to attach, continue to brush a little water between the billow and mark. Attach the second billow just over lapping the first billow pleat and the little scriber mark. Place your button/medallion on the pleats between the billows to create an impression of the medallion/button for later.
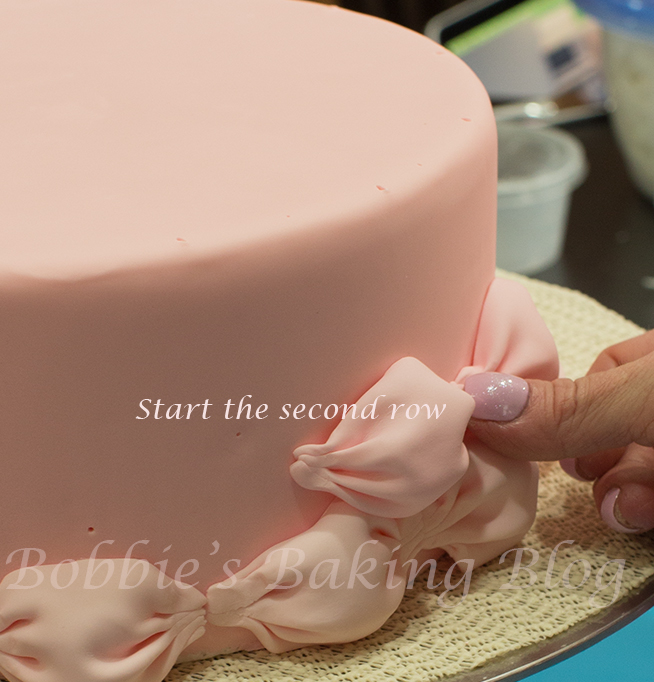
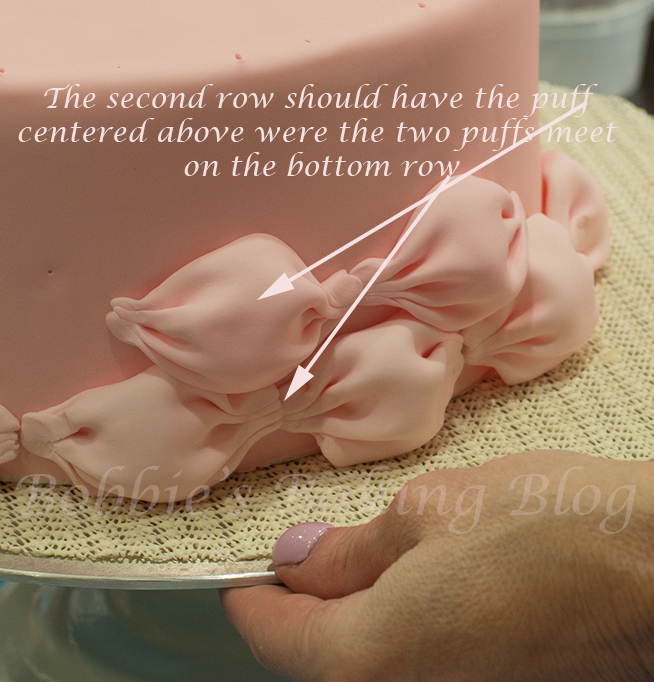
Second and Third Row:
You need 62 grams of 50/50 paste for the second row and an additional 62 grams of 50/50 paste for the third row.
The 2-1/2-inch square will be pleated the same way for both rows. Work with 12 squares at a time, placing them like before cutting and pleating the third row. Place your finished billows under a plastic cup to slow the drying process down. Your billows should be able to hold it’s shape, but still be pliable to attach to the cake.
To begin the second row mark the cake, all the way around. You will scribe a mark above where each of billow’s pleated ends are attached. Evaluate success of the second row; the puffy section of the billow will be correspond directly above the pleated section of the first row of billows. The third is mark in the same manor, evaluate success, the third row’s puffy section of the billow should align with the first (bottom row).
Remember to impress your button/medallion in between the billows on adjoining pleats.
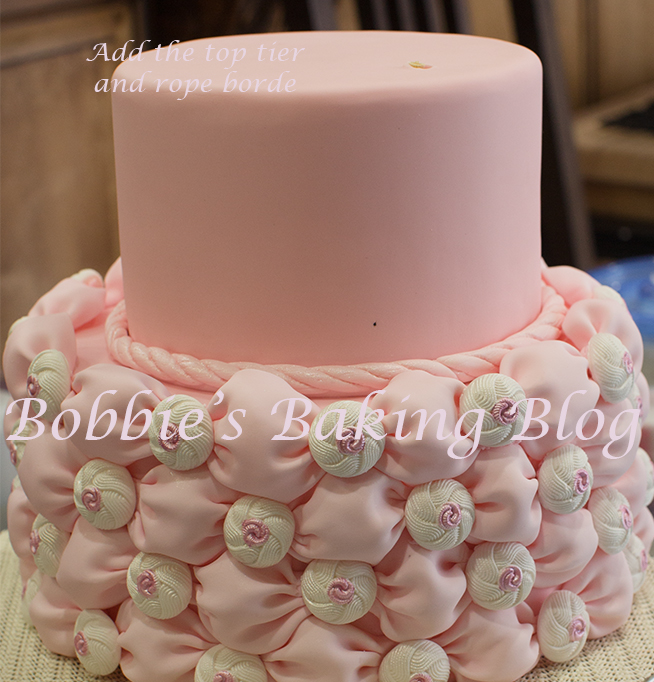
Second Tier and Border:
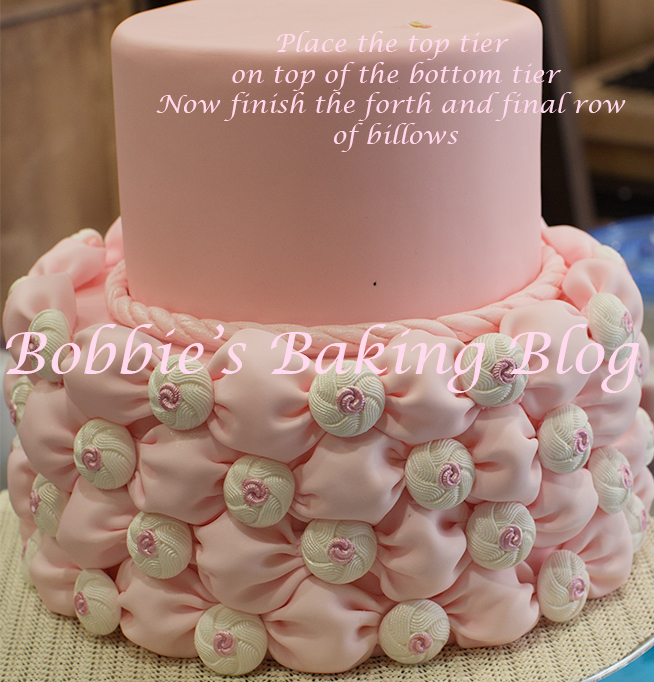
The fourth row of billows overlap the cake, you will want to add the top tier in place and add your border prior to attaching the fourth row of billows.
With your scriber tool or toothpick mark 6 equally separated marks to the 8 inch cake, remove the smart marker or the cake board, gentle push the lollypop sticks/or hollow dowels in the marked points, making sure to go all the way down to the cake board, mark your hollow dowels 1/32-inches above the cake. Remove the dowels, line them up to check the lines are even, cut the hollow dowels on the mark, place them back inside the corresponding holes (check with the cake board for evenness). Once the dowels are ready royal icing the middle section surrounded by the dowels, center, and lay the next tier on top of the dowels. Add your border of choice, I chose a rope.
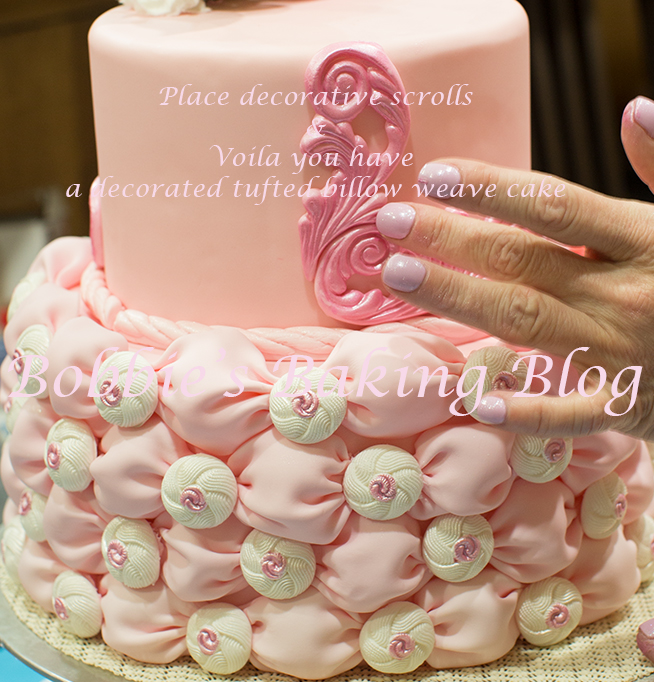
I proceeded to decorate the top tier with scrolls, I used sculpted scrolls and airbrushed the scrolls with the same pearlized pink airbrush color, and attached with a brush and a little water.
Fourth Row and Scrolls:
Now that you have tiered your cake and added your border it is time to finish the last row of billows.Roll your 50/50 paste to #4 on a pasta machine, cut with your square cutter, pleat your billows, and place them under your plastic cup as you finish the billows. Brush between the marks you created with the straight pins, attach the your first billow on the fourth flatten the pleat, each flatten pleat should cover the pin mark. To evaluate the fourth row success the puffy part of billow should align with second row billows.
Finally Assembly:
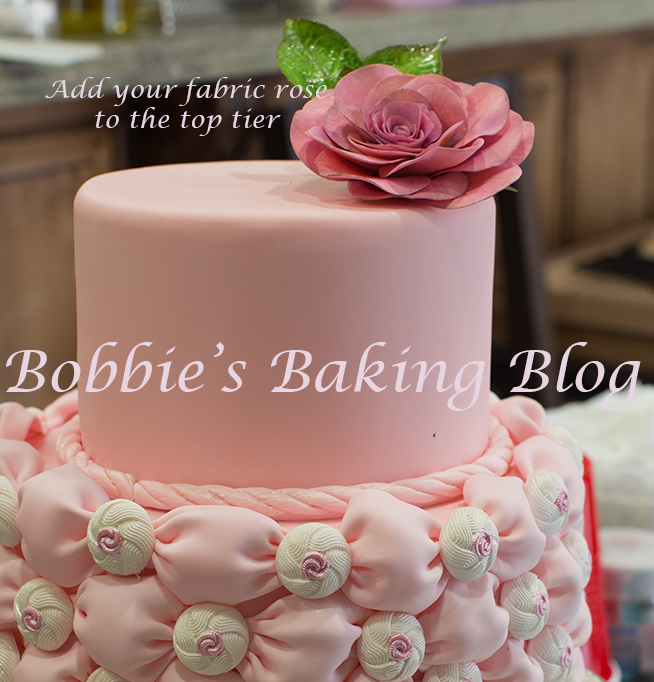
Attach the beautiful fabric sugar paste rose you made earlier. I chose to use sculpted scrolls, airbrushed the scrolls with the pearlized pink airbrush color I used for the buttons, and attached with water.
Attaching the Medallions/Buttons:
Mix the scraps of 50/50 and/or fondant with edible glue to a gooey consistency apply the goop to the back of the buttons/medallions, press the buttons into the impressions you placed as you attached the billows.
As always I would love to see your creative billow weave cakes and publish your photos (with permission and credit to you) on my Facebook page.

This is a super fun cake to design
Enjoy!
Voila!