
I love how your eyes go directly to the painted pansy and then the cross stitch!
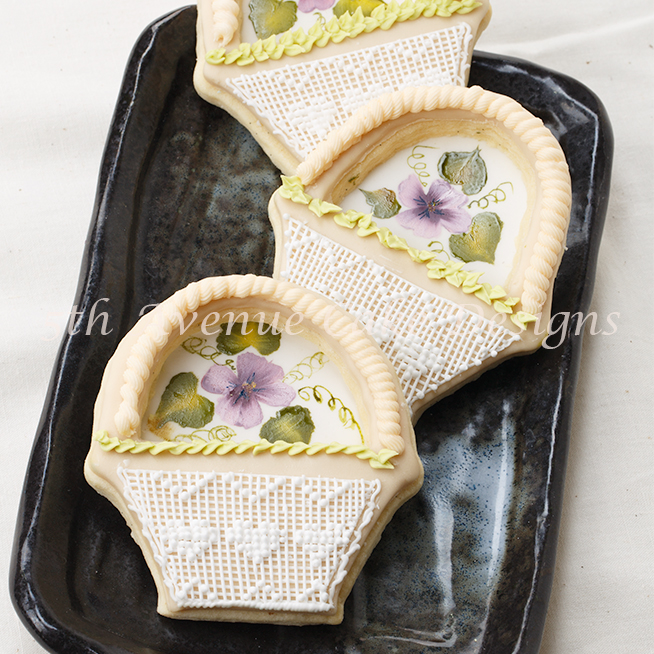
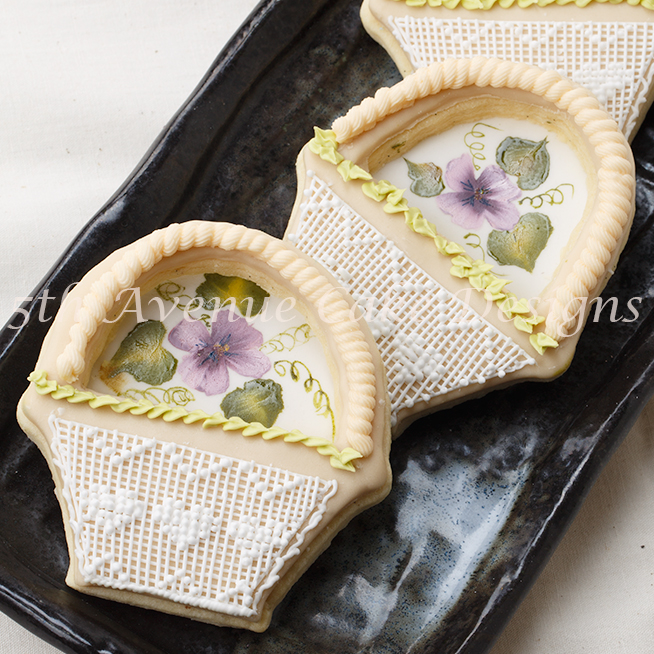
I especially love to create cookies/cakes that incorporate two elegant and versatile cake decorating techniques. The delicate cross stitching in combination with the hand painted pansy accomplishes both. The focal point is the hand painting, gradually you see the cross stitch design, and finally the entire cookie. The flower basket would be perfect for a plethora of occasions: Easter, Mother’s Day, wedding cookie favors, and bridal showers.
I wanted to create a tutorial that would help you with different piping techniques, royal icing cross stitch, hand painting a new flower (the pansy), as well as guide through a design that can be used for several occasions. It is always a good idea to have designs that can overlap occasions. With just a few supplies and plenty of creativity you could use this composition to accomplish many cookies and/or cakes.
Hand Painted Cross Stitch Flower Basket:

For the finishing touches I created different borders for each cookie!
Equipment:
- # 2/0 soft artist brush
- Scriber
- Blank grid (if you are creating your own design)
- Cross stitch pattern grid
- Parchment paper cones, 4 to 6
- PME # 1 tip, you will need two
- PME #43C
- Pme #ST50
- soft brush, for royal icing
- Scriber tool
- Paper towels
Materials:
- Royal icing recipe
- 1-recipe sugar cookies
- Food paste
- Ice blue,SF
- Red, Sf
- Super white, SF
- Caramel, SF
- Gooseberry, SF
- Bitter lemon, Sf
- Vine,SKGI
- Fondant
- Cooled boiled water
- Spray bottle
You can find the supplies, cross stitch patterns, and grid at 5th Avenue cake designs
You will want to paint inside the basket prior to piping your grid or any designs. The grid being extremely fragile leaves a high to chance for breakage if you do not paint prior.
Recipe for Pansy Petals and Leaves Colour:
3 parts red to 1 part ice blue, (the blue is very constrained)
White
2 parts yellow to 1 part vine green, and Gooseberry
Be sure to properly load your brush.
Royal Icing Consistencies Recipe:
For the grid you will need a parchment cone, fitted with #1 nozzle, filled with soft peak royal icing
For the beads in the grid you will need a 15 second consistency (I find 15 seconds creates a soft round bead that does not spread).
For the piped leaves you will need a parchment paper cone, fitted with ST50, filled off-peak consistency royal icing.
For the piped rope handle you will need a parchment paper cone, fitted #43C, filled with off-peak consistency royal icing.

Once you finish piping the beads for the design take a few step backs in order to see how it looks!
Now that you have all your materials ready, please enjoy the video tutorial!
The detailed HD Video Hand Painted Cross Stitch Video..30.09 minutes
Includes:
Panting the pansy, the leaves, and scroll tutorial from beginning to end
and
Pipe the cross stitch design from start to finish.
By mixing my primary two primary colours I was able to create may variations of purple for the pansy leaves!
Happy Easter! Wouldn’t this cookies be wonderful for an Easter basket goodie!
The hand painted cross stitch cookie can be for a variety of special occasions, as well as transferring the design for a matching cake to create a lovely theme!
Happy cookie decorating!


oh these may just be the most beautiful cookies ever
Maria, thank you for your sweet comment!
You have so much patience! Those cookies look wonderful. You’re very talented.
Thank you, piping royal icing can be relaxing.